close
Choose Your Site
Global
Social Media


Views: 0 Author: Site Editor Publish Time: 2025-08-15 Origin: Site


You might wonder if there is a set color for a stitch when you use an embroidery machine. The answer is no. The color of each stitch in your embroidery comes from two things: the digital design file and the thread you select. When you choose a thread color, you decide how your final project will look.
The stitch color changes with the thread you pick and the design file you use. Some embroidery design files show color details, but some do not. You might need to choose thread colors on your own. Embroidery software lets you set, change, and see stitch colors before you start. This helps you get good results. Color charts and testing threads on fabric help you match colors well. This stops surprises in your project. Picking the right thread type and color makes your embroidery look better. It makes your designs bright and easy to see.
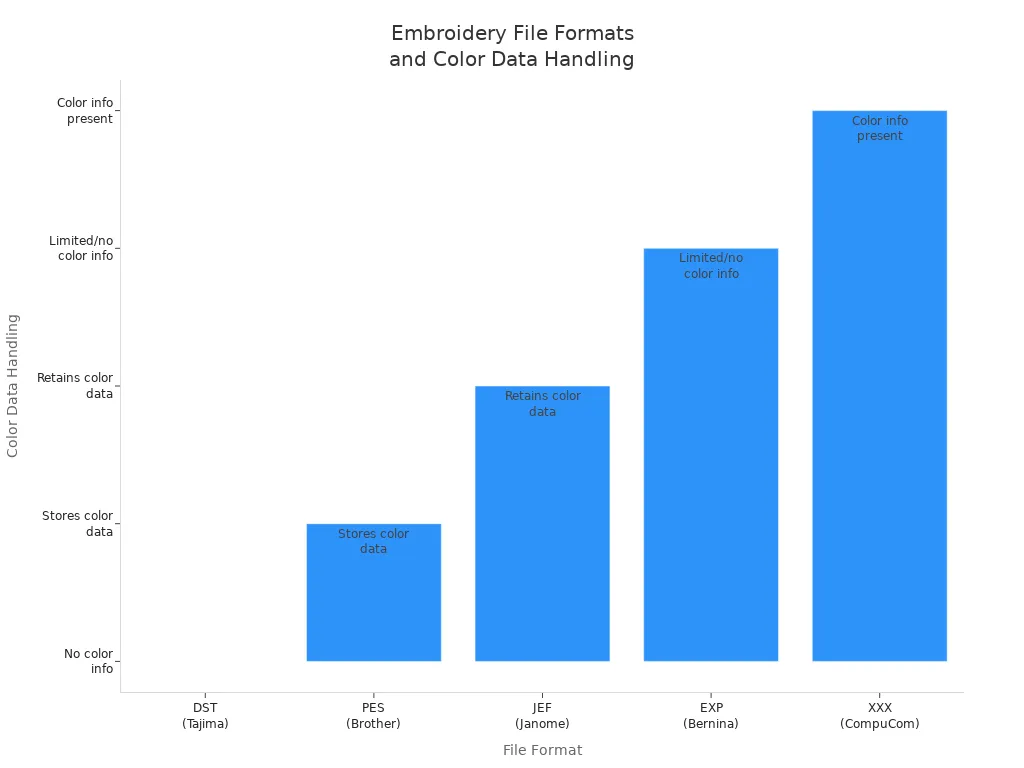
When you use machine embroidery, you start with digital design files. These files tell your embroidery machine where to put each stitch. The file also shows the order and type of stitches. Some file types, like PES and JEF, save thread color information. Others, like DST, only save where stitches go and skip color details. If your file does not have color data, you must pick the colors yourself.
Here is a table that shows how popular machine embroidery file formats handle color data:
File Format | Color Data Handling | Color Capacity | Compatibility | Notes |
|---|---|---|---|---|
DST | Does NOT store color information; only stitch data | N/A | Very broad, many commercial machines | Lightweight, universal but no color info |
PES | Stores color sequences and thread color data | Up to 127 colors | Brother/Baby Lock and compatible machines | Allows accurate color reproduction |
JEF | Retains color data and machine-specific commands | Not specified | Janome machines | Includes design specifics for precision |
EXP | Primarily stitch data, limited or no color info | Not specified | Bernina, Malcom, some others | Expanded format, less color detail |
XXX | Includes essential design and stitching details, color info present | Not specified | CompuCom, some Singer machines | Limited editing options |
Some formats make it easier to manage colors. If your file has color data, your embroidery machine can use the design’s color plan. If not, you need to choose thread colors on your own.
Tip: Always check your design file type before you start. This helps you know if you need to pick colors or if your embroidery machine will use the colors from the file.
Machine embroidery digitizing software gives you many ways to pick stitch colors. Here are the most common ways:
Use digitizing software to assign thread colors to parts of the design.
Use tools like the Design Palette to save your color changes.
Match design colors to thread brands and charts.
Change colors for single objects or whole color blocks.
Use color picker tools to copy colors from other parts of the design.
Use the same colors in different places for a matching look.
Pick new main colors and change the rest of the palette.
Use resequencing tools to change stitch order after color changes.
These features help you control every stitch and color in your design. Machine embroidery digitizing is flexible and lets you be precise.
You can change how your machine embroidery design looks by picking thread colors. Your choices decide how the embroidery will look in the end. When you pick thread colors, you control how each stitch looks on your fabric. This is true even if the design file suggests certain colors.
Here is a table showing some popular thread colors and how people use them in machine embroidery:
Thread Color Name | HEX Code | Description |
|---|---|---|
White | #FFFFFF | Bright color for highlights and backgrounds |
Black | #000000 | Used for outlines and dark details |
Navy | #333366 | Dark blue for depth |
Red | #CC3333 | Bright red for strong visual impact |
Gold | #FFCC00 | Bright yellow for highlights and luxury feel |
Kelly Green | #01784E | Dark green for contrast and depth |
Digitizing software lets you match thread colors to your original image. You can also change the number of colors and their order. This helps you control how details and outlines look in your embroidery. You can use custom thread matches to get the look you want. If you use fewer colors, the software may blend shades, which can change how the design looks.
Note: Picking the right thread colors is important. Good choices make your machine embroidery design clear and bright. Bad choices can make details hard to see.
You can make your embroidery special by choosing colors that fit your style or brand. Many digitizing programs have over 250 shades, so you have lots of options. Color charts can help you find the best match for your design.
Machine embroidery digitizing lets you control every stitch and color. You can edit, preview, and test your design before you start stitching. This helps you get the best results from your embroidery machine.

You pick the final color of each stitch by choosing your thread. The digital design file might suggest colors, but the real color shows when the thread goes into the fabric. When you pick a thread, you decide how your embroidery will feel. Color charts help you match thread shades to your fabric and other threads. You can test threads on small pieces of fabric to see how they look when stitched. This step helps you avoid surprises and makes sure your project looks like you want.
The bobbin thread is usually hidden, but it can still change how your embroidery looks. On thin fabrics or detailed designs, the bobbin color might show. For a neat finish, try to match the bobbin thread to the top thread. Thread makers offer many colors and types, like rayon, polyester, cotton, and metallic threads. You can find solid, variegated, neon, and special threads to give you more creative choices. These options let you make cool effects with every stitch.
At Zhuji Qihong Electro-Mechanical Co., Ltd., we have embroidery machines and accessories for all these thread choices. Our single head embroidery machine and multi-needle embroidery machine models help you try different threads and colors.
Embroidery machines use color sorting to make stitching faster. The machine puts all stitches of the same color together. This means you change thread colors less and save time. You can let the machine or software sort colors for you, or you can do it yourself for hard designs. Sorting by hand helps keep the design right and stops extra hoop movement.
If you use a multi-needle embroidery machine, you can load many thread colors at once. The machine switches threads by itself, so the process is quicker. Watching a stitch simulator on your screen lets you check the color order before you start. New digitizing software and AI tools help match thread colors to your design and adjust for fabric type. This makes sure your embroidery looks like your original image.
Tip: Always look at your design and color order before stitching. This step helps you find mistakes and get the best results from your embroidery machine.
Color charts help you plan your embroidery projects. These charts show the exact thread colors for each stitch. Many embroidery software programs have thread color libraries. You can search and pick colors from these libraries. The software shows thread brand names and color numbers. This helps you match your design to real threads. You see color swatches, so it is easy to compare shades.
Popular color charts come from brands like Madeira and Brother. You can use conversion charts to switch between brands. For example, if your design uses Brother thread numbers, you can find the closest match in Madeira or Janome. This keeps your colors the same, even if you change thread brands. Printable color charts help you plan before you start stitching. You avoid mistakes and make sure your embroidery looks right.
Thread color libraries also give you color change sheets. These sheets list every color in your design, the brand, and the order for stitching. You use these sheets to organize your threads and follow the right order. If you want to try new color mixes, you can swap colors and see them in the preview.
Embroidery software lets you see your design before you stitch. You can watch a playback and see each color in the design. The software shows the color order, the background, and the thread palette. You can change colors, test backgrounds, and adjust your design until you like it.
Software previews do not always look like the real stitched colors. The thread, fabric, and machine settings can change how colors look. Test stitch-outs help you find problems like puckering or misalignment. You use these tests to make sure your design looks good on your fabric.
Here is a table that shows common differences between software previews and real stitched results:
Discrepancy Cause | Explanation | Suggested Solution |
|---|---|---|
Fabric pull and shrinkage | Fabric tension during stitching causes fill and outline to shift, especially in thin areas. | Increase pull compensation so fill overlaps outline to prevent gaps after shrinkage. |
Insufficient pull compensation | Fill stitches pull fabric inward, misaligning outlines. | Adjust pull compensation settings to counteract fabric pull. |
Inadequate underlay stitching | Lack of proper underlay allows fabric to move under top stitches. | Use edge run or zigzag underlay to stabilize fabric before top stitching. |
Improper stitch order | Outline stitched long after fill or with jumps causes fabric movement between steps. | Sequence stitches so outline follows fill immediately and continuously to minimize jumps. |
Fabric and stabilizer choice | Stretchy or pile fabrics increase alignment issues. | Use cut-away stabilizer, tight hooping, and possibly floating stabilizer for better support. |
Different stitch types | Tatami and satin stitches behave differently under tension, affecting shape retention. | Be consistent with stitch types or test which holds shape better for the design scale. |
Some machine embroidery design files handle color assignment in different ways. Formats like DST do not include color data. You have to pick colors on your machine. Other formats, like PES and JEF, save color information and thread order. This makes it easier to preview and edit your design.
You use software previews and color charts to plan your stitch colors. You use test stitch-outs to check your choices. This helps you make embroidery that looks great and has the right colors and details.
You can control your embroidery design by changing stitch colors in your software. Most embroidery software has tools that let you change many details. You can pick single blocks, move or delete them, and change their colors. This helps you make your design special and match what you want.
Here is a table that shows how editing features help you change stitch colors:
Editing Feature | Description and Impact on Stitch Color Customization |
|---|---|
Select and edit individual blocks | Pick parts of a design and change their colors easily. |
Move, cut, copy, paste, delete blocks | Rearrange design elements and their colors for precise customization. |
Block editing (outline, stitch angle) | Control stitch appearance, which affects how colors show. |
Stitch editing (move/insert/delete) | Modify individual stitches for fine-tuned color changes. |
Change color of individual blocks | Directly customize stitch colors on selected sections. |
Adjust stitch density | Change how colors appear by altering stitch coverage and texture. |
Apply fabric presets | Adjust stitch settings for different fabrics, affecting color rendering. |
Embroidery settings window | Edit stitch colors on selected blocks for accuracy. |
Click-and-grab editing | Set colors and resize design elements interactively. |
Block list management | Control sewing order and stitch types, affecting color layering. |
Combine/edit text with designs | Add custom text with color options for personalization. |
Multiple software levels | Offer more tools for digitizing and color customization. |
Digitizing software lets you see your changes before you stitch. You can use simulation mode to check how your stitch colors will look. Many people learn these skills from online videos, free lessons, and by trying out digitizing programs. You can start with easy designs and get better at custom digitizing as you practice.
Tip: Try changing stitch colors on a test design first. This helps you avoid mistakes and learn how the tools work.
Picking the right threads helps your stitch colors look great. You can use color theory to match or contrast your threads with your design. For example, you might use one color for a calm look or opposite colors for a bold style. Always think about your fabric’s color and texture when you pick threads. Bright threads look good on light fabric, and soft colors work well on dark backgrounds.
Here is a table of popular thread brands and their color choices:
Brand | Color Range | Thread Types | Key Features and Popular Threads |
|---|---|---|---|
Madeira | Over 400 colors | Rayon, Polyester | Durable, smooth, silky sheen, fade resistant |
Isacord | Over 400 colors | Polyester | Strong, smooth finish, ideal for commercial use |
Sulky | Wide variety | Rayon, Cotton | Eco-friendly, vibrant colors |
Aurifil | Wide range | Cotton, Wool-blend | High quality, color consistency |
Brother | Moderate | Polyester, Metallic | Durable, affordable, compatible with many machines |
You can also use threads from Simthread and Robison Anton, which are known for their shine and strong color. When you pick threads, put them on your fabric and look at them in different lights. This helps you see how the stitch colors will look when finished. Try to use only 3–5 colors for a clear and balanced design. Use shade cards or digital palettes to match your threads to your design.
Note: The type of thread changes how colors look. Polyester is strong, rayon is shiny, and metallic threads make special effects. Always test your stitch colors on scrap fabric before you start your main project.
Custom digitizing lets you try different stitch colors and thread types. You can make cool effects and turn your embroidery ideas into real projects.
You get to pick the color for every stitch in your embroidery machine designs. How your project looks depends on your design file and the thread you use for each stitch. Changing stitch colors lets you make smooth color changes, add more detail, and work faster. You can try out different stitch colors and settings to make your project special. Many people say that being able to change stitch colors helps them make bright and eye-catching embroidery. Zhuji Qihong Electro-Mechanical Co., Ltd. helps you be creative with good embroidery machines and helpful advice. Try using new stitch color mixes and watch your ideas become real.
The thread you put in your embroidery machine sets the stitch color. The digital design file might show some colors, but you pick the thread. Your choice makes the final look.
Yes, you can change stitch colors before you start stitching. You can use embroidery software or pick new threads on your single head embroidery machine. This lets you make your own style.
No, not every design file has color data. Some formats, like DST, only show where stitches go. You need to pick thread colors yourself for these files.
You can use a color chart or a shade card. Put threads on your fabric and look at them in different lights. This helps you see how your stitches will look.
Thread Type | Features | Best Use |
|---|---|---|
Polyester | Strong, fade-resistant | Everyday embroidery |
Rayon | Shiny, smooth | Decorative designs |
Metallic | Sparkly, eye-catching | Special effects |
Tip: Always test your thread on scrap fabric first. This helps you see how it looks before you start your main project.


